CI/CD Pipeline for a Dockerized App on AWS (From zero to production).

For me, DevOps isn't just a job — it's a craft. I derive genuine excitement from turning tedious manual tasks into automated workflows that run like clockwork. As a junior DevOps engineer, I've already made tangible impacts, like implementing a Jenkins CI/CD pipeline that cut deployment times by 30% and significantly reduced release-day errors.
𝗞𝗲𝘆 𝗦𝗸𝗶𝗹𝗹𝘀 & 𝗔𝗰𝗵𝗶𝗲𝘃𝗲𝗺𝗲𝗻𝘁𝘀
𝗔𝘂𝘁𝗼𝗺𝗮𝘁𝗶𝗼𝗻 & 𝗖𝗜/𝗖𝗗: Built and maintained continuous integration pipelines (Jenkins, GitHub Actions) that accelerated deployment cycles by eliminating manual steps, saving ~5 hours per week.
𝗖𝗹𝗼𝘂𝗱 𝗜𝗻𝗳𝗿𝗮𝘀𝘁𝗿𝘂𝗰𝘁𝘂𝗿𝗲 (𝗔𝗪𝗦): Deployed and managed scalable applications on AWS using infrastructure as code (Terraform), ensuring consistent environments and smooth rollouts.
𝗖𝗼𝗻𝘁𝗮𝗶𝗻𝗲𝗿𝗶𝘇𝗮𝘁𝗶𝗼𝗻 & 𝗢𝗿𝗰𝗵𝗲𝘀𝘁𝗿𝗮𝘁𝗶𝗼𝗻: Implemented containerization with Docker and orchestrated services using Kubernetes, enabling microservice architectures and seamless deployments.
I approach each challenge with a humble mindset — there's always a new tool or technique to master — but also with the confidence that I can devise effective solutions. I've thrived in globally distributed teams and am adept at remote collaboration, using clear communication to keep projects on track across time zones. Ultimately, I'm on a mission to bridge the gap between development and operations to help teams deliver reliable software faster. I'm excited to continue growing as a DevOps professional. My goal is to bring my energy, curiosity, and commitment to excellence to a forward-thinking remote team that values continuous improvement and innovation.
At the end of the project, you should be able to confidently say to your potential employer:
"I built a CI/CD pipeline using GitHub Actions to automatically test, build, and deploy a Dockerized application to AWS EC2, using Nginx and a blue/green strategy to achieve zero-downtime deployments."
Step 0.1 — Create a new project folder On your local machine:
cd ~/OneDrive/Desktop
mkdir start-project1-cicd-from-scratch
cd start-project1-cicd-from-scratch
Initialize git:
git init
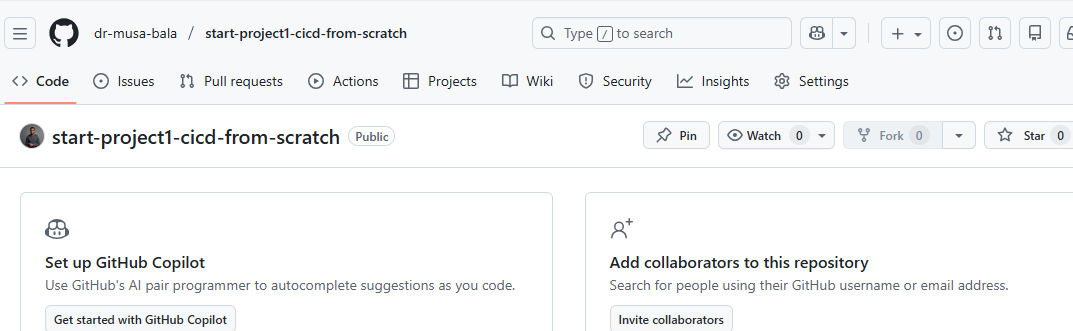
Step 0.2 — Create a NEW GitHub repository Go to 👉 https://github.com/new
- Repository name:
start-project1-cicd-from-scratch
Visibility: Public ❌ Do NOT add README ❌ Do NOT add .gitignore Create the repo.
Then connect local → GitHub:
git remote add origin https://github.com/dr-musa-bala/start-project1-cicd-from-scratch.git
git branch -M main
Step 0.3 — Confirm clean state Run:
git status
You should see:
On branch main
No commits yet
✅ This is perfect.
🧱 PHASE 1 — Build the Minimal Node App (the “deploy target”)
Goal: Create a tiny app + test so CI has something real to run. 1) Create the project files From inside start-project1-from-scratch run:
npm init -y
npm i express
npm i -D jest supertest
2) Create app.js.
code app.js
Paste:
const express = require("express");
const app = express();

app.get("/", (req, res) => {
  res.send("Project 1: CI/CD from scratch ✅");
});

app.get("/health", (req, res) => {
  res.status(200).send("OK");
});

module.exports = app;
3) Create server.js
code server.js
Paste:
const app = require("./app");

const PORT = process.env.PORT || 3000;

app.listen(PORT, () => {
  console.log(`Server running on port ${PORT}`);
});
4) Create a test file
Create folder + test:
mkdir test
code test/app.test.js
Paste:
const request = require("supertest");
const app = require("../app");

describe("GET /", () => {
  it("should return 200", async () => {
    const res = await request(app).get("/");
    expect(res.statusCode).toBe(200);
  });
});
5) Update package.json scripts Open:
code package.json
Replace the scripts section with:
"scripts": {
  "start": "node server.js",
  "test": "jest"
}
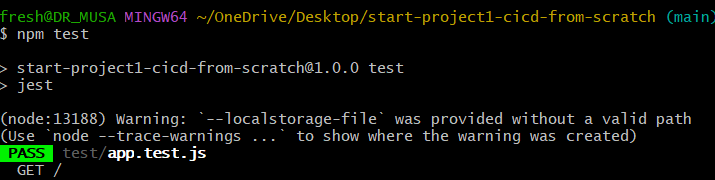
6) Run locally (must pass)
npm test
You should now see output like:
PASS  test/app.test.js
✓ should return 200
npm start
Open in browser: http://localhost:3000
You should see: Project 1: CI/CD from scratch ✅

Stop server with:
- Ctrl + C
🧱 PHASE 2 — Dockerize the App (so CI/CD can ship it) Goal: Package your app into a Docker image that runs the same everywhere. 1) Create Dockerfile (in project root)
Run:
code Dockerfile
This opens up VS Code. Paste:
FROM node:18-alpine

WORKDIR /app

COPY package*.json ./
RUN npm ci --only=production

COPY . .

EXPOSE 3000

CMD ["npm", "start"]
Control + S to save.
2) Create .dockerignore (keeps image clean)
code .dockerignore
Paste:
node_modules
npm-debug.log
.git
.github
Dockerfile
docker-compose.yml
README.md
3) Create docker-compose.yml (local run)
code docker-compose.yml
Paste:
services:
  app:
    build: .
    ports:
      - "3000:3000"
Ensure at this stage that your Docker Desktop is powered on.
4) Build + run with Docker Compose From project root:
docker compose up --build
Test in browser:
You should see: Project 1: CI/CD from scratch ✅

Stop:
- Ctrl + C
Then clean up:
docker compose down
🧱 PHASE 3 — Push to GitHub + Add CI (GitHub Actions) Goal: Every push runs tests automatically. If tests fail → pipeline fails.
1) Commit and push your current code From project root:
git add .
git commit -m "Phase 2: Add Node app + tests + Docker setup"
git push -u origin main
Got an error.

Git is telling you the truth:
“I’m trying to push to a repository that does not exist at that URL.”
So either:
the GitHub repo was not created, or
the repo name is slightly different from what your local git thinks
We’ll fix this cleanly.
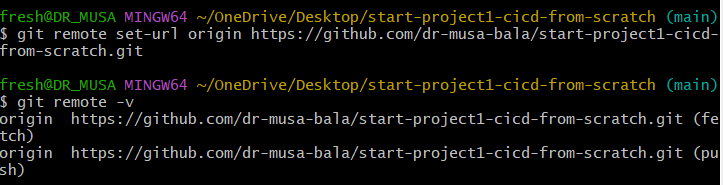
✅ STEP 1 — Check what remote URL Git is using
Run:
git remote -v

From the picture illustration above we can see where the problem is coming from wrong repo (repo not tallying).
Lets reset repo. Enter the command:
git remote set-url origin https://github.com/dr-musa-bala/start-project1-cicd-from-scratch.git
git remote -v
Now we push again;
git push -u origin main
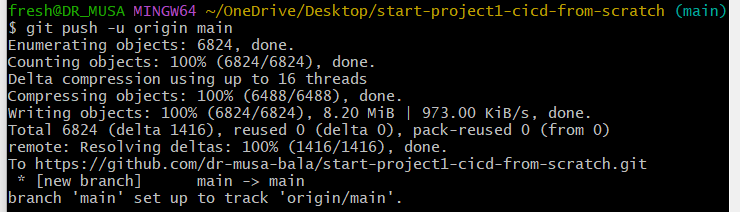
Check github under same repository.
🧱 PHASE 3 (CONT.) — Add GitHub Actions CI 1) Create the workflow file From your project root:
mkdir -p .github/workflows
code .github/workflows/ci.yml
Paste this:
name: CI

on:
  push:
    branches: ["main"]
  pull_request:

jobs:
  test:
    runs-on: ubuntu-latest

    steps:
      - name: Checkout
        uses: actions/checkout@v4

      - name: Setup Node
        uses: actions/setup-node@v4
        with:
          node-version: "18"
          cache: "npm"

      - name: Install dependencies
        run: npm ci

      - name: Run tests
        run: npm test
Save.
2) Commit + push
git add .github/workflows/ci.yml
git commit -m "Add GitHub Actions CI pipeline"
git push
3) Verify it’s running
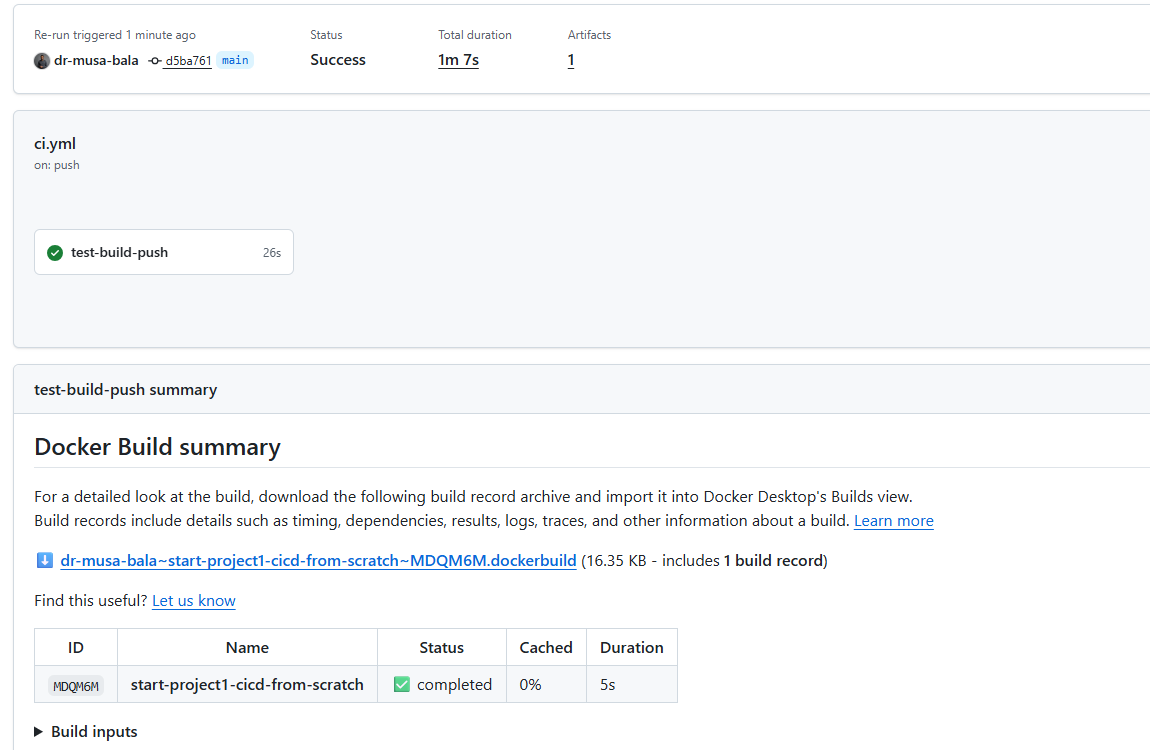
Go to your GitHub repo → Actions tab → you should see a workflow run.
✅ If it turns green, you’re done.

✅ That means Project 1 now has real CI.
Now we level it up into CD: build a Docker image in CI and push it to Docker Hub automatically.
🧱 PHASE 4 — Docker Hub Build & Push (CD starts)
0) One-time setup on Docker Hub (important)
You need:
Docker Hub username Docker Hub Access Token (not your password)
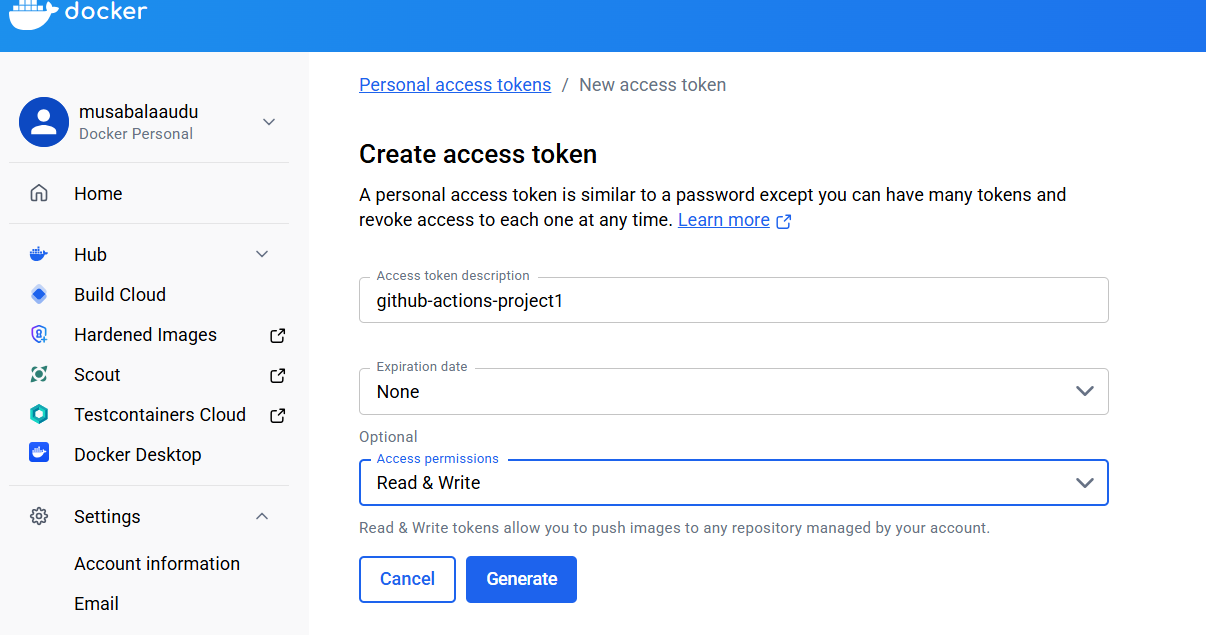
Create the token
Docker Hub → Account Settings → Security → New Access Token Name it: github-actions-project1 Copy it (you won’t see it again).
1) Add GitHub Secrets (this is the “secret stuff” done correctly)
In your GitHub repo: Settings → Secrets and variables → Actions → New repository secret
Create exactly these:
DOCKERHUB_USERNAME = your Docker Hub username (e.g., drmusabala)
DOCKERHUB_TOKEN = the access token you generated
✅ Secret names are fixed (left box) ✅ Secret values are your real details (right box)
2) Update workflow to build & push Docker image
Open the workflow:
code .github/workflows/ci.yml
Replace its content with this (CI + Docker push):
name: CI/CD

on:
  push:
    branches: ["main"]
    tags:
      - "v*.*.*"
  pull_request:

jobs:
  test-build-push:
    runs-on: ubuntu-latest

    steps:
      - name: Checkout repository
        uses: actions/checkout@v4

      - name: Setup Node.js
        uses: actions/setup-node@v4
        with:
          node-version: "18"
          cache: "npm"

      - name: Install dependencies
        run: npm ci

      - name: Run tests
        run: npm test

      - name: Log in to Docker Hub
        uses: docker/login-action@v3
        with:
          username: ${{ secrets.DOCKERHUB_USERNAME }}
          password: ${{ secrets.DOCKERHUB_TOKEN }}

      - name: Build and push Docker image
        uses: docker/build-push-action@v6
        with:
          context: .
          push: true
          tags: |
            ${{ secrets.DOCKERHUB_USERNAME }}/project1-cicd:latest
3) Commit + push
git add .github/workflows/ci.yml
git commit -m "Add Docker build and push to Docker Hub"
git push
Very critical: Make sure in your secrets, it's your Docker Hub username you are using. Because I kept using my GitHub username and keeps getting errors.
You have successfully built, tested****, containerized, authenticated, and pushed an image via CI. That’s core DevOps skill.
BONUS: 📌 Immediate next steps (important) 1️⃣ Lock this win into documentation (VERY important)
To be pasted in README.md
🚀 **Production CI/CD Pipeline — Docker & GitHub Actions**

This project demonstrates my ability to design, implement, and troubleshoot a production-grade CI/CD pipeline using modern DevOps tooling.

It reflects how CI/CD is actually done in real teams, including secure credential handling, container image lifecycle management, and failure debugging — not just “happy-path” automation.

🔍 What This Project Proves

- By completing this project end-to-end, I demonstrate the ability to:
- Build automated CI pipelines triggered on source control events
- Containerize applications using Docker best practices
- Securely authenticate and push images to Docker Hub
- Manage secrets and tokens using GitHub Actions
- Debug real CI failures (auth issues, build errors, test failures)
- Think in terms of repeatability, security, and automation
- This is the same workflow used in real production teams — simplified, but not diluted.

🧱 Technical Stack

- CI/CD: GitHub Actions
- Containerization: Docker
- Registry: Docker Hub
- Runtime: Node.js
- OS (CI runners): Linux
- Version Control: Git & GitHub
- 🔁 CI/CD Workflow (High-Level)

The pipeline automatically runs on every push to main.

- Pipeline Stages:
- Source checkout
- Node.js environment setup
- Dependency installation
- Test execution
- Secure login to Docker Hub
- Docker image build
- Docker image push to registry

📍 Workflow definition:

.github/workflows/ci.yml

🐳 Docker Image Automation

- The application is built into a Docker image and published automatically.
- Image build is fully automated
- Authentication uses Docker Hub access tokens
- No credentials are committed to source control

Example:

docker pull <dockerhub-username>/start-project1-cicd-from-scratch:latest

🔐 Security Practices

- Security was treated as a first-class concern, not an afterthought.
- Secrets stored in GitHub Actions Secrets
- Docker Hub authentication via access token, not password
- No sensitive data committed to Git
- Pipeline follows least-privilege principles

Secrets used:

DOCKERHUB_USERNAME

DOCKERHUB_TOKEN

📂 Repository Structure
.
├── .github/workflows/ci.yml   # CI pipeline definition
├── Dockerfile                # Production-ready Docker image
├── docker-compose.yml        # Local orchestration
├── index.js                  # Application entry point
├── package.json              # Dependencies & scripts
└── README.md

🧪 Testing Philosophy

- Tests are executed automatically during CI
- Pipeline fails fast if tests fail
- Enforces discipline expected in real engineering teams
- This models quality gates commonly used in production pipelines.

🧠 Engineering Mindset Demonstrated

This project emphasizes:

- Automation over manual steps
- Secure-by-default configuration
- Debugging over blind copy-paste
- Reproducibility across environments
- Clear separation between build, test, and release stages

🚀 Why This Matters to Employers

This project shows I can:

- Contribute to existing CI/CD systems
- Own small-to-medium automation tasks independently
- Understand how code moves from commit → container → registry
- Communicate infrastructure clearly through code and documentation
- It forms a strong foundation for:
- Continuous Deployment (CD)
- Cloud deployments (EC2, ECS, Kubernetes)
- Infrastructure as Code (Terraform)

📈 Next Steps (Planned Enhancements)

- Automated deployment to cloud (EC2)
- Zero-downtime deployment strategies
- Monitoring & health checks
- Infrastructure provisioning with Terraform

👤 About Me

**Dr. Musa Bala Audu**
Junior DevOps Engineer — Open to Remote Roles
GitHub: https://github.com/dr-musa-bala
Dev.to: https://dev.to/bala_audu_musa
Hashnode: https://hashnode.com/@musabalaaudu
Your README should include:
Project overview
CI workflow explanation
Docker image link
What problem it solves
What you learned
✅ Step 1: Make sure you are in the project directory
In Git Bash, run:
pwd
You should see something like:
/Users/fresh/OneDrive/Desktop/start-project1-cicd-from-scratch
If not, go there:
cd ~/OneDrive/Desktop/start-project1-cicd-from-scratch
✅ Step 2: Confirm README exists
ls
You must see:
README.md
If you don’t, create it:
touch README.md
✅ Step 3: Open README and paste the content
Open with VS Code (recommended):
code README.md
👉 Paste the recruiter-tailored README I wrote for you 👉 Save the file (Ctrl + S) 👉 Close the editor
✅ Step 4: Stage the README git add README.md
Check status:
git status
You should see:
new file: README.md
or
modified: README.md
✅ Step 5: Commit the README (important message)
Use a professional commit message:
git commit -m "docs: add production-grade README for CI/CD project"
✅ Step 6: Push to GitHub git push origin main
If main is already tracking:
git push
✅ Step 7: Verify on GitHub
Open your repo in browser
Refresh the page
You should see:
README rendered automatically
Professional project overview visible to recruiters


