Provisioning AWS Infrastructure Using Terraform (IaC)

For me, DevOps isn't just a job — it's a craft. I derive genuine excitement from turning tedious manual tasks into automated workflows that run like clockwork. As a junior DevOps engineer, I've already made tangible impacts, like implementing a Jenkins CI/CD pipeline that cut deployment times by 30% and significantly reduced release-day errors.
𝗞𝗲𝘆 𝗦𝗸𝗶𝗹𝗹𝘀 & 𝗔𝗰𝗵𝗶𝗲𝘃𝗲𝗺𝗲𝗻𝘁𝘀
𝗔𝘂𝘁𝗼𝗺𝗮𝘁𝗶𝗼𝗻 & 𝗖𝗜/𝗖𝗗: Built and maintained continuous integration pipelines (Jenkins, GitHub Actions) that accelerated deployment cycles by eliminating manual steps, saving ~5 hours per week.
𝗖𝗹𝗼𝘂𝗱 𝗜𝗻𝗳𝗿𝗮𝘀𝘁𝗿𝘂𝗰𝘁𝘂𝗿𝗲 (𝗔𝗪𝗦): Deployed and managed scalable applications on AWS using infrastructure as code (Terraform), ensuring consistent environments and smooth rollouts.
𝗖𝗼𝗻𝘁𝗮𝗶𝗻𝗲𝗿𝗶𝘇𝗮𝘁𝗶𝗼𝗻 & 𝗢𝗿𝗰𝗵𝗲𝘀𝘁𝗿𝗮𝘁𝗶𝗼𝗻: Implemented containerization with Docker and orchestrated services using Kubernetes, enabling microservice architectures and seamless deployments.
I approach each challenge with a humble mindset — there's always a new tool or technique to master — but also with the confidence that I can devise effective solutions. I've thrived in globally distributed teams and am adept at remote collaboration, using clear communication to keep projects on track across time zones. Ultimately, I'm on a mission to bridge the gap between development and operations to help teams deliver reliable software faster. I'm excited to continue growing as a DevOps professional. My goal is to bring my energy, curiosity, and commitment to excellence to a forward-thinking remote team that values continuous improvement and innovation.
6 million dollar question: “If everything went down today, could you rebuild it from code?”
After this project, the answer is YES.
🎯 PROJECT 3 — GOALS
By the end of this project, you will:
Provision AWS infrastructure entirely from code
Create and destroy EC2 safely using Terraform
Manage Security Groups declaratively
Understand Terraform state (very important)
Be able to say (confidently):
“I provision AWS infrastructure using Terraform.” 📦 WHAT WE WILL BUILD (CLEAR SCOPE)
Terraform will create:
✅ EC2 instance (Ubuntu)
✅ Security Group
SSH (22)
HTTP (80)
✅ Key Pair (or reference existing)
✅ Output values (public IP)
This will replace manual EC2 creation.
🗂 PROJECT STRUCTURE (PROFESSIONAL)
project-3-terraform-aws/
├── main.tf
├── variables.tf
├── outputs.tf
├── terraform.tfvars
└── README.md
NB: Note that we are using Bash terminal throughout the project except stated otherwise.
🧱 CLASS 1 — TERRAFORM SETUP & BASICS Step 1: Install Terraform (Windows)
Download: 👉 https://developer.hashicorp.com/terraform/downloads
Choose:
Windows AMD64
Extract terraform.exe
Add it to PATH
How do you add to path?
🧱 STEP 4 — ADD TERRAFORM TO PATH (CRITICAL)
This is the step most people miss.
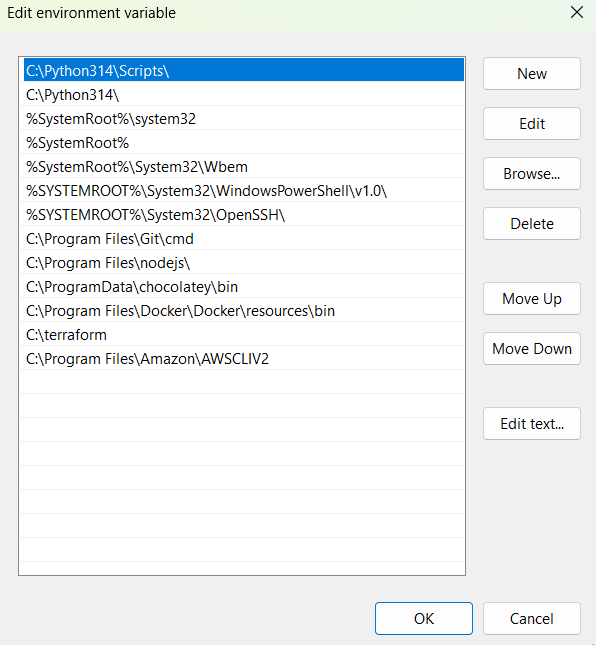
3️⃣ Add C:\terraform to PATH (CRITICAL)
Press Windows key
Search: Environment Variables
Open Edit the system environment variables
Click Environment Variables
Under System variables, select Path
Click Edit
Click New
Click on Browse.. and select the terraform folder we have save in C:.
Click OK on all windows.
⚠️ You must close and reopen Git Bash after this.
🧪 STEP 5 — VERIFY INSTALLATION
Close all terminals.
Open Git Bash again, then run: Verify:
terraform -version
You must see a version number.
✅ STEP 2: Create the Terraform project directory
Now create it:
mkdir project-3-terraform-aws
Enter it:
cd project-3-terraform-aws
Confirm:
pwd
You should see:
.../Desktop/project-3-terraform-aws
✅ Now you’re in the right place.
☁️ AWS SETUP — KEY PAIR (SAFE & CORRECT) 🎯 What we are doing
By the end of this, you will have:
An AWS account
An EC2 Key Pair
A .pem file saved safely
The key pair NAME ready for Terraform ⚠️ We are NOT creating EC2 yet — just preparing access.
STEP 1: Log in to AWS Console
Go to: 👉 https://console.aws.amazon.com/
Sign in with your AWS account. STEP 2: Select the correct region (IMPORTANT)
Top-right corner of AWS Console:
Select US East (N. Virginia) → us-east-1
Why?
Free-tier friendly
Matches our Terraform default
Most tutorials & AMIs work here
STEP 3: Go to EC2 Dashboard
In the AWS search bar, type:
EC2
Click EC2.
STEP 4: Create a Key Pair
In the left sidebar:
Network & Security → Key Pairs
Click Create key pair.
Fill the form:
Name:
terraform-key
(simple, professional, reusable)
Key pair type: RSA
Private key file format: .pem
Click Create key pair.
STEP 5: SAVE THE KEY FILE (VERY IMPORTANT)
Your browser will download:
terraform-key.pem
Do NOT delete it
Do NOT rename it
⚠️ AWS will never show this file again.
✅ STEP 3: Initialize the project files Create the Terraform files we’ll use:
`touch main.tf variables.tf outputs.tf terraform.tfvars`
Confirm:
ls
You should see:
main.tf variables.tf outputs.tf terraform.tfvars
Now that the folder exists and files are created, open it in VS Code:
code .
Step 1: Paste variables.tf
Open variables.tf and paste:
variable "region" { description = "AWS region" type = string default = "us-east-1" }
variable "instance_type" { description = "EC2 instance type (keep low-cost)" type = string default = "t2.micro" }
variable "key_name" { description = "Existing AWS key pair name (NOT the .pem filename)" type = string }
Step 2: Paste `main.tf`

Open `main.tf `and paste:
terraform { required_providers { aws = { source = "hashicorp/aws" version = "~> 5.0" } } }
provider "aws" { region = var.region }
resource "aws_security_group" "web_sg" { name = "terraform-web-sg" description = "Allow SSH and HTTP"
ingress { description = "SSH" from_port = 22 to_port = 22 protocol = "tcp" cidr_blocks = ["0.0.0.0/0"] }
ingress { description = "HTTP" from_port = 80 to_port = 80 protocol = "tcp" cidr_blocks = ["0.0.0.0/0"] }
egress { from_port = 0 to_port = 0 protocol = "-1" cidr_blocks = ["0.0.0.0/0"] } }
data "aws_ami" "ubuntu" { most_recent = true
filter { name = "name" values = ["ubuntu/images/hvm-ssd/ubuntu-jammy-22.04-amd64-server-*"] }
filter { name = "virtualization-type" values = ["hvm"] }
owners = ["099720109477"] # Canonical (Ubuntu) }
resource "aws_instance" "web" { ami = data.aws_ami.ubuntu.id instance_type = var.instance_type key_name = var.key_name
vpc_security_group_ids = [aws_security_group.web_sg.id]
tags = { Name = "terraform-web-instance" } }
Step 3: Paste `outputs.tf`

Open `outputs.tf` and paste:
output "public_ip" { description = "Public IP of the EC2 instance" value = aws_instance.web.public_ip }
Step 4: Set `terraform.tfvars`

Open `terraform.tfvars` and paste (edit the key name):
key_name = "YOUR_KEYPAIR_NAME"
⚠️ This must be your AWS Key Pair name (example: nodejs-key) — not nodejs-key.pem.

Step 5: Run Terraform commands (from Git Bash in project-3 folder)
terraform init terraform fmt terraform validate terraform plan
STEP 6: Confirm the **Key Pair** exists

Back in `AWS Console → Key Pairs`

You should see:
terraform-key
👉 Terraform uses the **name**
👉 SSH uses the **.pem file**

STEP 7: Prepare for **Terraform**

Now go back to your local machine.

Open:

`project-3-terraform-aws/terraform.tfvars`


Set:
key_name = "terraform-key"
✅ This is correct.

🚀 PROJECT 3 — CLASS 2 (CONTINUED)
Terraform Plan → Apply → Verify → Destroy (Cost-Safe)

You already have:

✅ Terraform installed

✅ AWS CLI configured

✅ Key pair created: terraform-key

✅ Terraform files created

Now we proceed.

✅ **Step 1: Set the key pair in Terraform**

Open `terraform.tfvars` and confirm it contains exactly:

`key_name = "terraform-key"`

Save the file.

✅ FIX AWS CLI v2 (Windows 11)

Step 1: Check if AWS CLI files actually exist

Open File Explorer and go to:
C:\Program Files\Amazon\AWSCLIV2\
Look for:
aws.exe
Also check this folder:
C:\Program Files\Amazon\AWSCLIV2\bin\
Look for:
aws.exe
How to add PATH:

Press **Win key** → type **Environment Variables**

Open **Edit the system environment variables**

Click **Environment Variables…**

Under User variables (top), select **Path** → **Edit**

New → paste the path above

**OK → OK → OK**

✅ Now close ALL terminals (PowerShell + Git Bash) and reopen PowerShell.

Test:

**where aws
aws --version**

**After AWS works: configure creds for Terraform**

Once `aws --version` works, do:
aws configure
Set:

region: `us-east-1
`
output: `json`

Then confirm:
aws sts get-caller-identity
Then go back to your **Terraform folder** and **run**:
terraform plan
Expected output (example):
C:\Program Files\Amazon\AWSCLIV2\aws.exe aws-cli/2.xx.x Python/3.xx Windows/10 exe/AMD64
✅ **Then continue Project 3 (Terraform AWS)**
Configure AWS credentials:
aws configure
Enter:

**Access Key ID** → from AWS IAM
**Secret Access Key** → from AWS IAM
**Region** → `us-east-1`
**Output** → `json`

Verify:
aws sts get-caller-identity
Then:
Copy code terraform init terraform plan
You should get a successful result.
**Next step (Project 3)**
From the same folder `(~/OneDrive/Desktop/project-3-terraform-aws)` run:
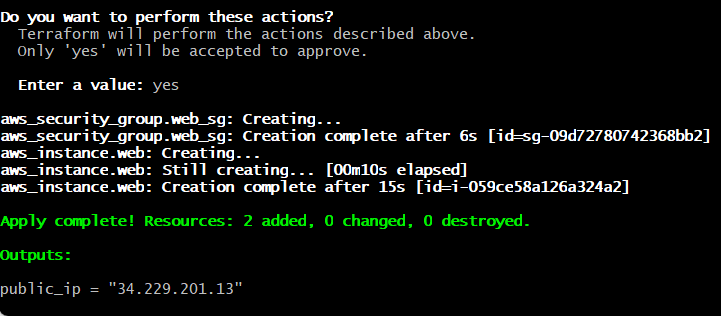
terraform apply
Type **yes **when it asks.

After it finishes, **run**:
terraform output
You should see the
public_ip
**1) Get the EC2 Public IP**
Run (in the same project folder):
terraform output public_ip
If it says “no outputs found”, run:
terraform refresh terraform output
(That will display it.)

Then we test it

1) SSH into the server (Git Bash)

Your keypair name is terraform-key, so your file is likely on Desktop.

Run:
chmod 400 ~/OneDrive/Desktop/terraform-key.pem ssh -i ~/OneDrive/Desktop/terraform-key.pem ubuntu@34.229.201.13
If your key is in **Downloads** instead:
chmod 400 ~/Downloads/terraform-key.pem ssh -i ~/Downloads/terraform-key.pem ubuntu@34.229.201.13
2) Once you’re inside EC2: install Docker and run the proof app

Paste these **exactly**:
sudo apt-get update -y sudo apt-get install -y docker.io sudo systemctl enable --now docker sudo usermod -aG docker ubuntu newgrp docker docker run -d --name hello -p 80:80 nginx:alpine
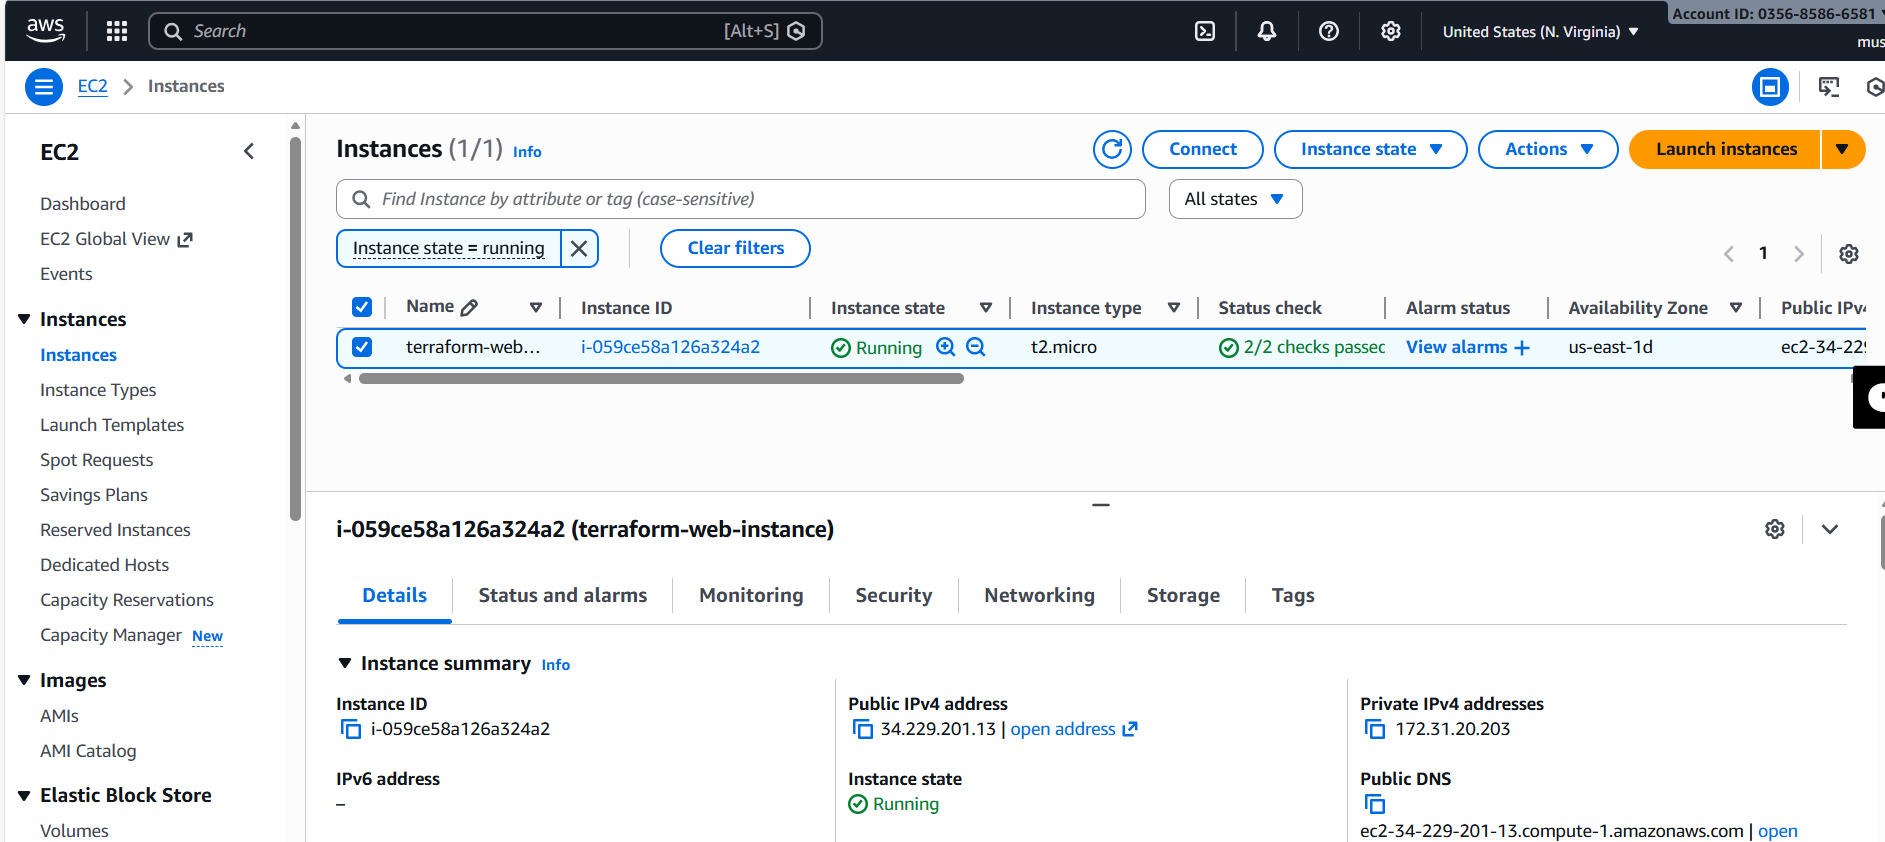
Now open in your browser:
http://34.229.201.13
You should see the Nginx page ✅

Destroy everything (from your Terraform folder)
Make sure you’re in the right folder:
cd ~/OneDrive/Desktop/project-3-terraform-aws
Run:
terraform destroy
Type: yes
This will remove:
EC2 instance
Security Group
- Confirm it’s gone
After it completes, run:
terraform output
It should either show nothing useful or error because resources are gone.


